First Charge
2021/6/13
第一次充电!
参考的源代码放到了这里。
函数参数后接冒号
例如下面的代码:
@torch.no_grad()
def parallel_cdg(
    num_parallel: int,
    target_model: nn.Module,
    test_model: nn.Module,
    x: Tensor,
    epsilon: float,
    learning_rates: Tensor,
    normalize=True,
    device="cuda",
):
冒号后的类型没有任何作用,既不会强制assert判断类型,也不会强制类型转换,它的意义仅在于提醒传入的类型…
解锁model.layers!
有新的属性可用了:
>>> test_model.layers
Sequential(
  (0): Linear(in_features=32, out_features=32, bias=False)
  (1): Linear(in_features=32, out_features=32, bias=False)
  (2): Linear(in_features=32, out_features=32, bias=False)
  (3): Linear(in_features=32, out_features=32, bias=False)
  (4): Linear(in_features=32, out_features=1, bias=False)
)
等等,这条有点问题:layers不是torch属性!是自己定义的,但是直接点名应该也是可以的。
但是可以先找到一层layer,比如:
current_layer = test_model.layers[index]
然后再查看这一层的参数:
>>>current_layer.weight
Parameter containing:
tensor([[ 0.1455, -0.0464, -0.0353,  ..., -0.0428, -0.0315,  0.1042],
        [ 0.1239,  0.1276,  0.1281,  ..., -0.0424,  0.0704, -0.0329],
        [-0.0358,  0.1069,  0.1584,  ...,  0.1205, -0.0175, -0.0277],
        ...,
        [-0.0660,  0.0587,  0.0234,  ...,  0.0313, -0.0032, -0.0263],
        [-0.1423, -0.0062,  0.0052,  ...,  0.1025,  0.0693,  0.0065],
        [-0.0059,  0.0783,  0.0250,  ..., -0.1757,  0.1583,  0.0006]],
       device='cuda:7', requires_grad=True)
这样的操作是允许的!
更加自由的层选取和前传
注意禁用一下auto_grad。
# save intermediate result of previous layers
    new_x = test_model.layers[:i_layer](x)

    current_layer = test_model.layers[i_layer]
    latter_layers = test_model.layers[i_layer + 1 :]
    assert isinstance(current_layer, nn.Linear)
- 这里第一行是自由选取层传x;
- 第二行取model中的某一层;
- 第三行又是取一部分层;
- 见上一分节,这个用法应该是仅对sequential有效?
总算让我找到zip()的实例了!
参考资料在这里(python2版本)和这里(python3版本)。
- 描述:
zip() 函数用于将可迭代的对象作为参数,将对象中对应的元素打包成一个个元组,然后返回由这些元组组成的列表。
如果各个迭代器的元素个数不一致,则返回列表长度与最短的对象相同,利用 * 号操作符,可以将元组解压为列表。 - 注意事项:
zip 方法在 Python 2 和 Python 3 中的不同:在 Python 3.x 中为了减少内存,zip() 返回的是一个对象。如需展示列表,需手动 list() 转换。
偷一些示例:
>>> a = [1,2,3]
>>> b = [4,5,6]
>>> c = [4,5,6,7,8]
>>> zipped = zip(a,b)     # 返回一个对象
>>> zipped
<zip object at 0x103abc288>
>>> list(zipped)  # list() 转换为列表
[(1, 4), (2, 5), (3, 6)]
>>> list(zip(a,c))              # 元素个数与最短的列表一致
[(1, 4), (2, 5), (3, 6)]

>>> a1, a2 = zip(*zip(a,b))          # 与 zip 相反,zip(*) 可理解为解压,返回二维矩阵式
>>> list(a1)
[1, 2, 3]
>>> list(a2)
[4, 5, 6]
一些要注意的点:
- zip的对象既可以是
list也可以是tuple;
itertools - 迭代器相关
没接触过的全新概念,估计实际用起来还需要一段消化时间。
参考文献是这篇博客。
但是方便查询我就完全嫖下来了:
迭代器的官方文档。
itertools 模块提供的迭代器函数有以下几种类型:
- 无限迭代器:生成一个无限序列,比如自然数序列
1, 2, 3, 4, ...;

- 有限迭代器:接收一个或多个序列(sequence)作为参数,进行组合、分组和过滤等;
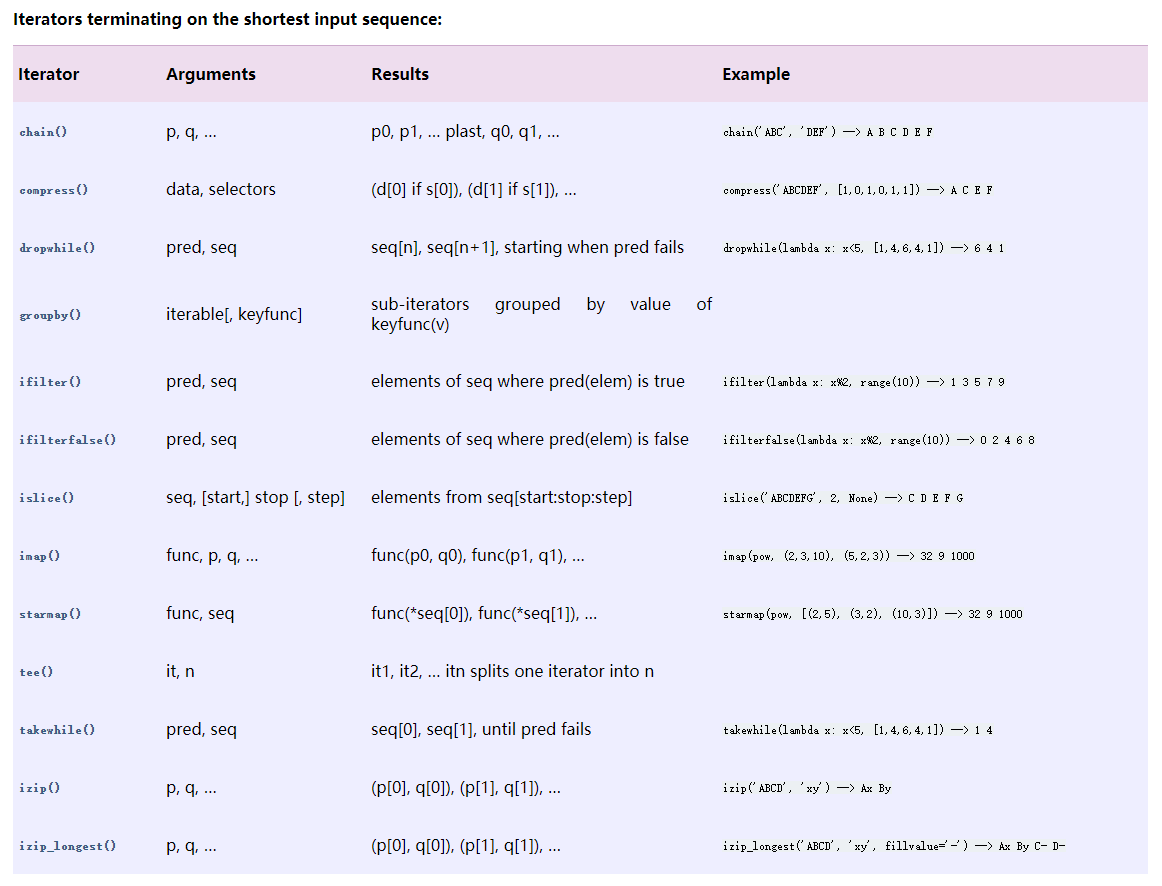
- 组合生成器:序列的排列、组合,求序列的笛卡儿积等;
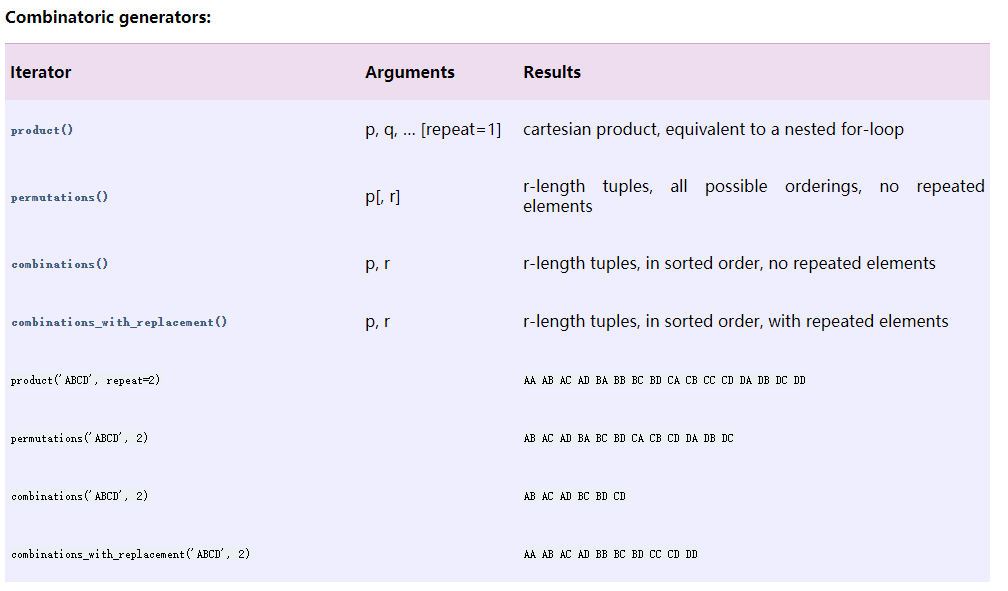
迭代器+zip生成index的实例:
感觉很厉害,组合起来很烧脑,很上头:
def get_all_indices(num_parallel, in_features, out_features):
    # Get all indices where the weights will be changed in a parallelized linear layer
    # Output is a tensor of shape [3, D_out \times D_in]
    return torch.tensor(
        [
            (k, j, i)
            for k, (j, i) in zip(
                itertools.cycle(range(num_parallel)),
                itertools.product(
                    range(out_features),
                    range(in_features),
                ),
            )
        ]
    ).t()

>>> get_all_indices(512, 32, 32)
tensor([[  0,   1,   2,  ..., 509, 510, 511],
        [  0,   0,   0,  ...,  31,  31,  31],
        [  0,   1,   2,  ...,  29,  30,  31]])
总之不要觉得tuple有形状就行了,itertools.product的每个值就是一个点,和itertools.cycle的combine起来就行。
Tensor.split()
将原来的Tensor拆开——参考资料:
- 参数说明:
split(
    value,
    num_or_size_splits,
    axis=0,
    num=None,
    name='split'
)
-
- value: 输入的tensor
- num_or_size_splits: 如果是个整数n,就将输入的tensor分为n个子tensor。如果是个tensor T,就将输入的tensor分为len(T)个子tensor。
- axis: 默认为0,计算value.shape[axis], 一定要能被num_or_size_splits整除。
实例:
indices = get_all_indices(8, 4, 4)

print(indices)
print(indices.split(8, dim=1))
----------------------------------
tensor([[0, 1, 2, 3, 4, 5, 6, 7, 0, 1, 2, 3, 4, 5, 6, 7],
        [0, 0, 0, 0, 1, 1, 1, 1, 2, 2, 2, 2, 3, 3, 3, 3],
        [0, 1, 2, 3, 0, 1, 2, 3, 0, 1, 2, 3, 0, 1, 2, 3]])
(tensor([[0, 1, 2, 3, 4, 5, 6, 7],
         [0, 0, 0, 0, 1, 1, 1, 1],
         [0, 1, 2, 3, 0, 1, 2, 3]]),
 tensor([[0, 1, 2, 3, 4, 5, 6, 7],
         [2, 2, 2, 2, 3, 3, 3, 3],
         [0, 1, 2, 3, 0, 1, 2, 3]]))
Tensor.unbind()
我直接照搬PyTorch官方文档。
这个作用是去掉tensor的某个维度,按照这个维度打开返回一些tuple。
torch.unbind(input, dim=0) → seq
- 参数说明:
- input (Tensor) – the tensor to unbind
- dim (int) – dimension to remove
- 我直接把例子偷过来:
>>> torch.unbind(torch.tensor([[1, 2, 3],
>>>                            [4, 5, 6],
>>>                            [7, 8, 9]]))
(tensor([1, 2, 3]), tensor([4, 5, 6]), tensor([7, 8, 9]))
Tensor.repeat() & Tensor.expand()
好家伙,查repeat的用法还跟着看到了expand的用法,这里应该可以参考这篇知乎专栏。
以及repeat的官方文档和expand的官方文档。
torch.Tensor有两个实例方法可以用来扩展某维的数据的尺寸,分别是repeat()和expand():
- expand(*sizes) → Tensor
返回当前张量在某维扩展更大后的张量。扩展(expand)张量不会分配新的内存,只是在存在的张量上创建一个新的视图(view),一个大小(size)等于1的维度扩展到更大的尺寸。注意,expand能且只能作用到维度为1的维。如果扩张前的维度不为1,那么扩张时该维的指示数不是原来的数,就是-1。 - 例子(都可以偷):
- 正确示例1:
>>> x = torch.tensor([[1], [2], [3]]) >>> x.size() torch.Size([3, 1]) >>> x.expand(3, 4) tensor([[ 1, 1, 1, 1], [ 2, 2, 2, 2], [ 3, 3, 3, 3]]) >>> x.expand(-1, 4) # -1 means not changing the size of that dimension tensor([[ 1, 1, 1, 1], [ 2, 2, 2, 2], [ 3, 3, 3, 3]])- 正确示例2:
>>> x = torch.randn(2, 1, 1, 4) >>> x.expand(-1, 2, 3, -1) tensor([[[[ 0.2023, -0.8915, 1.3229, 1.9416], [ 0.2023, -0.8915, 1.3229, 1.9416], [ 0.2023, -0.8915, 1.3229, 1.9416]], [[ 0.2023, -0.8915, 1.3229, 1.9416], [ 0.2023, -0.8915, 1.3229, 1.9416], [ 0.2023, -0.8915, 1.3229, 1.9416]]], [[[-0.7470, -0.5382, -1.4638, 0.7967], [-0.7470, -0.5382, -1.4638, 0.7967], [-0.7470, -0.5382, -1.4638, 0.7967]], [[-0.7470, -0.5382, -1.4638, 0.7967], [-0.7470, -0.5382, -1.4638, 0.7967], [-0.7470, -0.5382, -1.4638, 0.7967]]]])- 错误示例:
>>> x = torch.randn(2, 2, 1, 4) >>> x.expand(-1, 4, 3, -1) ----------------------------------------------------------- RuntimeError Traceback (most recent call last) <ipython-input-50-bcd5140ca0a1> in <module> 1 x = torch.randn(2, 2, 1, 4) ----> 2 x.expand(-1, 4, 3, -1) RuntimeError: The expanded size of the tensor (4) must match the existing size (2) at non-singleton dimension 1. Target sizes: [-1, 4, 3, -1]. Tensor sizes: [2, 2, 1, 4] -
官方红信:
  More than one element of an expanded tensor may refer to a single memory location. As a result, in-place
  operations (especially ones that are vectorized) may result in incorrect behavior. If you need to write
  to the tensors, please clone them first.
大意是扩张后的tensor可能指向同一块内存地址,in-place(就地)操作,尤其是矢量化的操作,可能会导致错误的结果,如果需要对这个tensor修改,还是先clone罢。
实现出来大概是这个意思:
  >>> x = torch.randint(-10,10,(1, 2))
  >>> print(x)
  >>> x = x.expand(2, 2)
  >>> print(x)
  >>> x[0, 0] = 10
  >>> print(x)
  tensor([[-4, -1]])
  tensor([[-4, -1],
          [-4, -1]])
  tensor([[10, -1],
          [10, -1]])
确实只改了[0, 0]位置的这个tensor,但是后面[1, 0]也跟着变了。
repeat()则是另一种更安全的复制方法,它沿着特定的维度重复这个张量,和expand()不同的是,这个函数拷贝张量的数据。
- repeat(*sizes) → Tensor
-
我直接接着偷例子:
  >>> x = torch.tensor([1, 2, 3])
  >>> x.repeat(4, 2)
  tensor([[ 1,  2,  3,  1,  2,  3],
          [ 1,  2,  3,  1,  2,  3],
          [ 1,  2,  3,  1,  2,  3],
          [ 1,  2,  3,  1,  2,  3]])
  >>> x.repeat(4, 2, 1).size()
  torch.Size([4, 2, 3])
是不是感觉expand()没啥用?但是下面的例子就有点厉害:
L_a = F.mse_loss(y_test, y_target_ex, reduction="none").mean(dim=(1, 2))
看来expand()还是有用的,误会解除!
厉害的index传播以及传新检索方式
动机是看到代码的这里:
new_weight[k, j, i] += epsilon
这里new_weight是在batch维度传播了的weight(size = [512, 32, 32]),后面的k/j/i分别是size=[512, 1]的index vector。有两个发现:
- 索引直接用","分隔就行,也就是说
new_weight[i][j][k]和new_weight[i, j, k]是等价的! -
然后比较震惊的是index可以用tensor vector来索引…一是tensor可以索引,二是vector可以索引!(虽然之前在awnas也看到过吧),做了个测试,目标是第一个5->10,第二个13->18,看样子是这么回事:
  >>> w = torch.tensor(range(16)).view(4, 4)
  >>> w = w.repeat(2, 1, 1)
  >>> epsilon = 5
  >>> k = torch.tensor([0, 1])
  >>> i = torch.tensor([1, 3])
  >>> j = torch.tensor([1, 1])
  >>> w[k, i, j] += epsilon
  >>> w
  tensor([[[ 0,  1,  2,  3],
       [ 4, 10,  6,  7],
       [ 8,  9, 10, 11],
       [12, 13, 14, 15]],

      [[ 0,  1,  2,  3],
       [ 4,  5,  6,  7],
       [ 8,  9, 10, 11],
       [12, 18, 14, 15]]])
Tensor.transpose()
作用是转置输入tensor的某两维。转置前后的tensor共享同一块内存,所以修改其中一个,另一个也会跟着改变。
- torch.transpose(input, dim0, dim1) → Tensor
- 相关参数:
- input (Tensor) – the input tensor.
- dim0 (int) – the first dimension to be transposed
- dim1 (int) – the second dimension to be transposed
- 偷来的实验:
>>> x = torch.randn(2, 3)
>>> x
tensor([[ 1.0028, -0.9893,  0.5809],
        [-0.1669,  0.7299,  0.4942]])
>>> torch.transpose(x, 0, 1)
tensor([[ 1.0028, -0.1669],
        [-0.9893,  0.7299],
        [ 0.5809,  0.4942]])
但是高维的转置太难想了,超越极限…比如:
>>> x = torch.tensor(range(12)).view(2, 2, 3)
>>> print(x)
>>> print(x.transpose(0, 1))
tensor([[[ 0,  1,  2],
         [ 3,  4,  5]],

        [[ 6,  7,  8],
         [ 9, 10, 11]]])
tensor([[[ 0,  1,  2],
         [ 6,  7,  8]],

        [[ 3,  4,  5],
         [ 9, 10, 11]]])
只能猜个大概[捂脸]
最后有关MLP的一些细节
看到这里的一些转置我彻底麻了:
def parallel_linear(weight, x):
    return torch.matmul(weight, x.t()).transpose(1, 2)
这里实际上对weight进行转置应该也没问题,但是是不是因为.t()比.transpose()快所以没这么转呢?没有求证。
此外,这里尤其需要注意的是哪里该转置而哪里又不该!比如以下的例子(和上面是一致的)就是对的:
test_model = MLP(32).to(device)
current_layer = test_model.layers[2]
prelayer = test_model.layers[:2]
prelayer_ = test_model.layers[:3]
latter_layer = test_model.layers[3:]
input = torch.randn((32,32),device=device)
x = prelayer(input)
x_o = prelayer_(input)
output = test_model(input)
output_ = latter_layer(torch.matmul(current_layer.weight, prelayer(input).t()).transpose(0,1))
print(output)
print(output_)
而这个例子也是对的:
output_ = latter_layer(torch.matmul(prelayer(input), current_layer.weight.t()))
这应该能说明起码两件事:
-
torch.matmul()的两个输入是有顺序的(当然也很好想)! - MLP的矩阵运算有点奇怪,需要额外注意。